Physiotherapy Physical Therapy WordPress Theme - Please visit official website at RayoflightThemes.com for portfolio and contact
Physiotherapy - Physical Therapy WordPress Theme
Created: 05/20/2015 m/d/y
By: Rayoflightthemes
Thank you for purchasing Physiotherapy WordPress Theme. Please read documentation and follow instructions for theme set-up.
If you have questions please send email through Rayoflightthemes Themeforest contact form using account that you purchased theme with to confirm purchase.
Before contact please read more about support on Rayoflightthemes profile page.
Click HERE for Rayoflightthemes Themeforest profile page.
Thanks so much!
Table of Contents
- Steps for Theme set-up - READ FIRST!
- How to set (and reset) permalinks if there is 404 no found page for posts.
- How to change color
- Basic theme structure (how theme works)
- How to use page builder
- Shortcodes
- Page templates
- Theme translation
- Contact form
- How to reorder posts
- Plugins
- Widgets
- Custom post types - sliders, carousels, team, gallery, box columns etc
- How to change favicon
- CSS files
- JS files
- PHP files
- Sources and credits
Steps for Theme set-up - top
-
1. Upload „Physiotherapy.zip“ and „Physiotherapy-child.zip“ folders to your hosting inside wordpress/wpcontent/themes folder and unzip it. You can upload it through WordPress dashboard too.
-
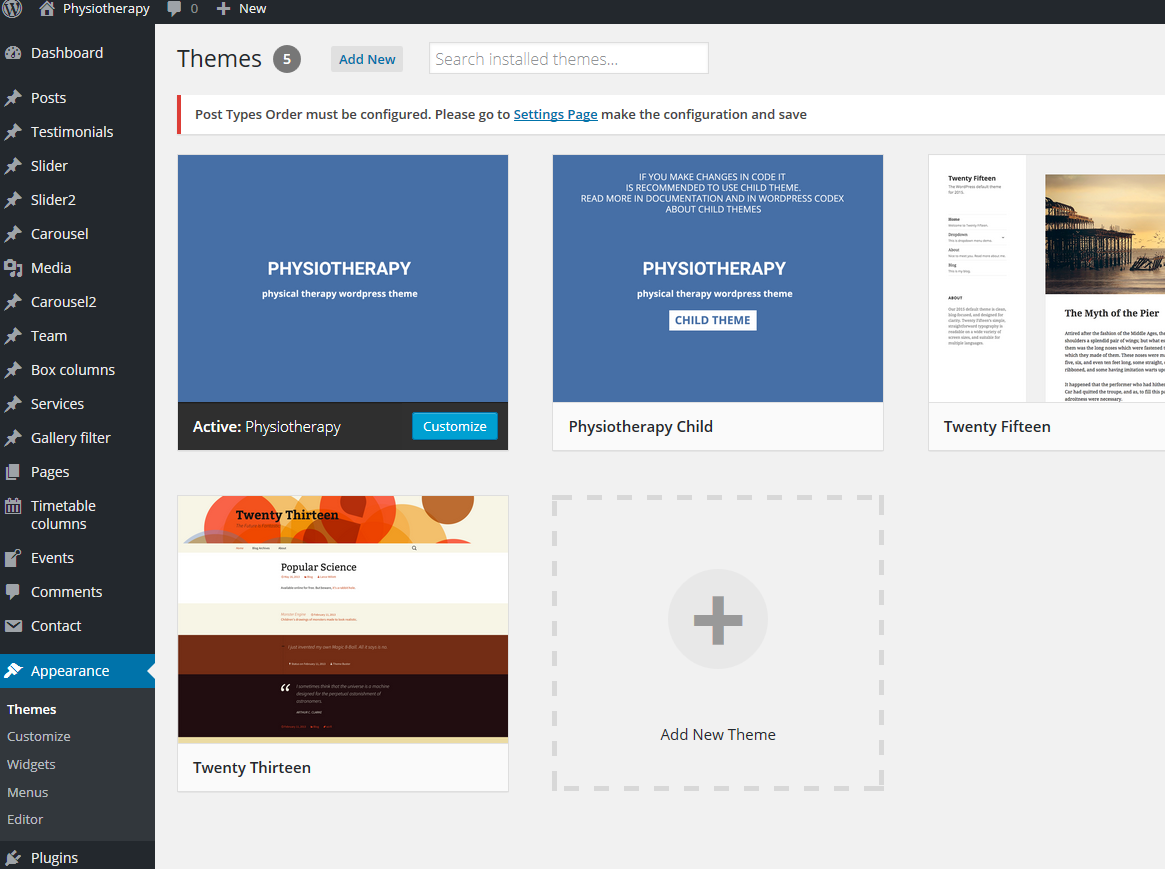
2. In WordPress dashboard go to appearance/themes/ and activate theme „Physiotherapy“
-
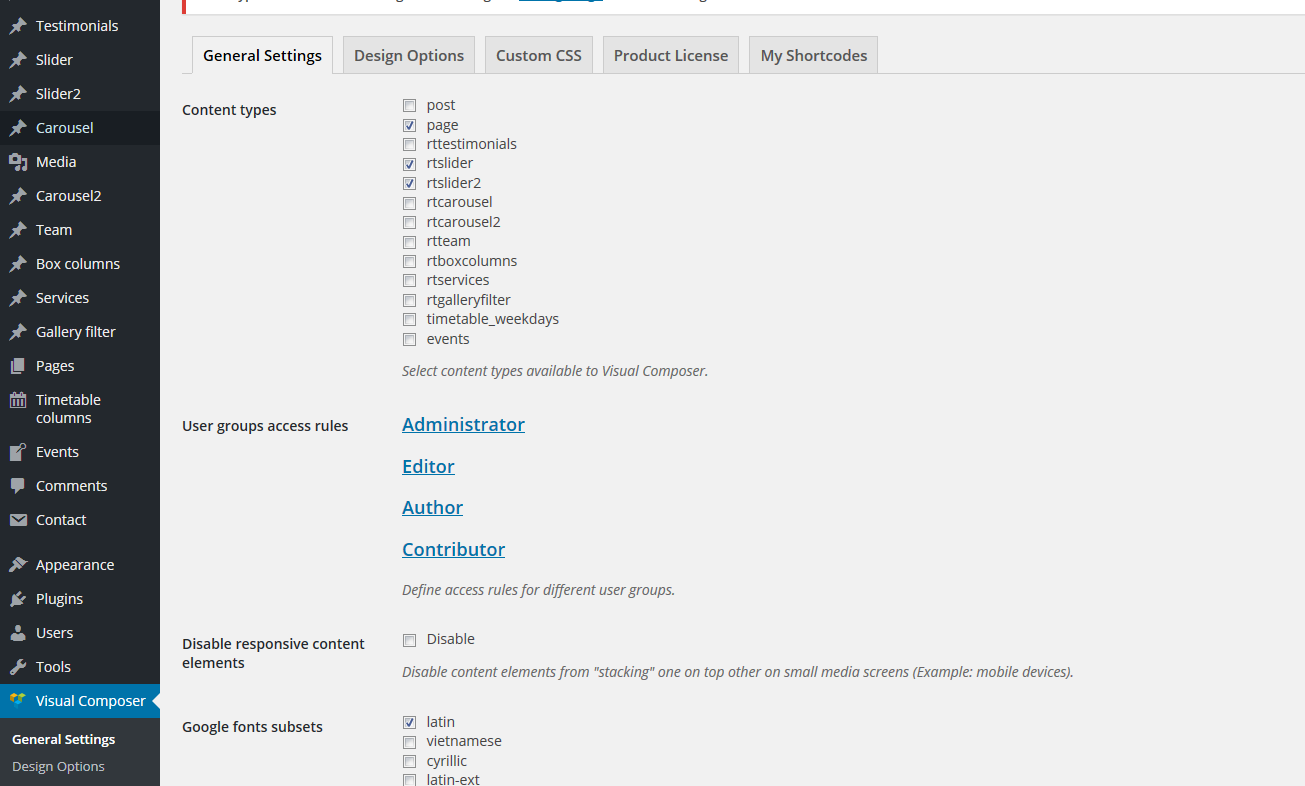
3. Install and activate all recommended and required theme’s plugins
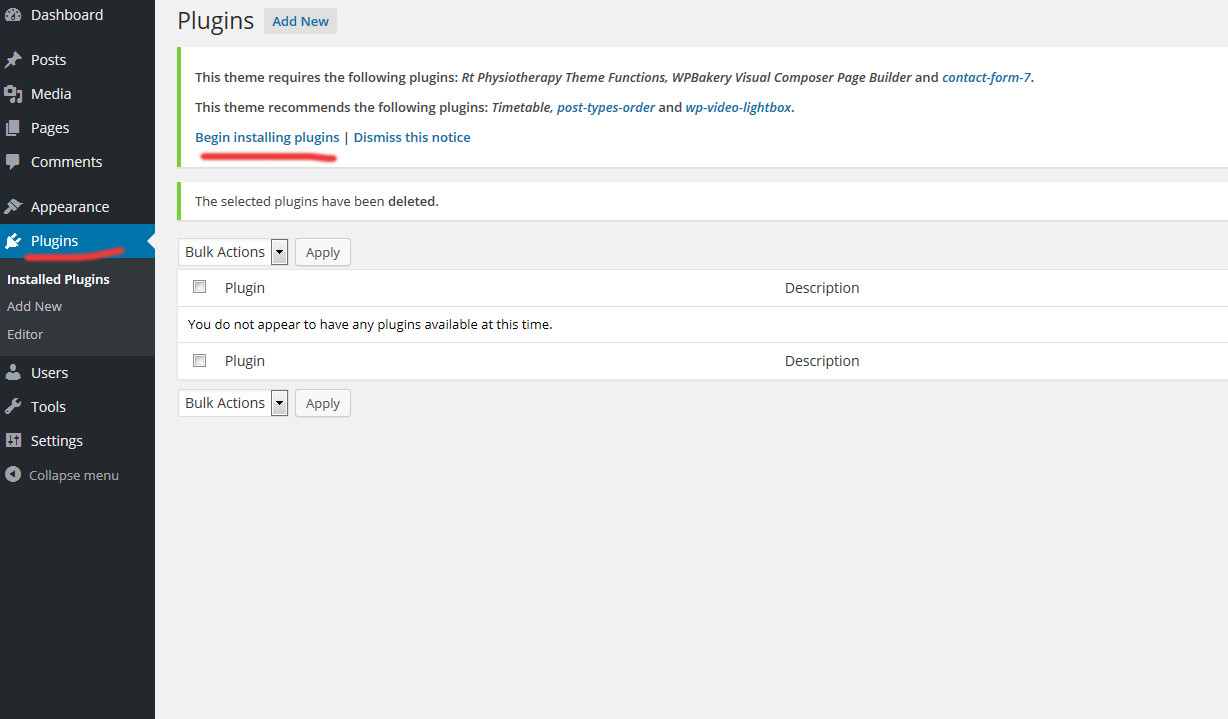

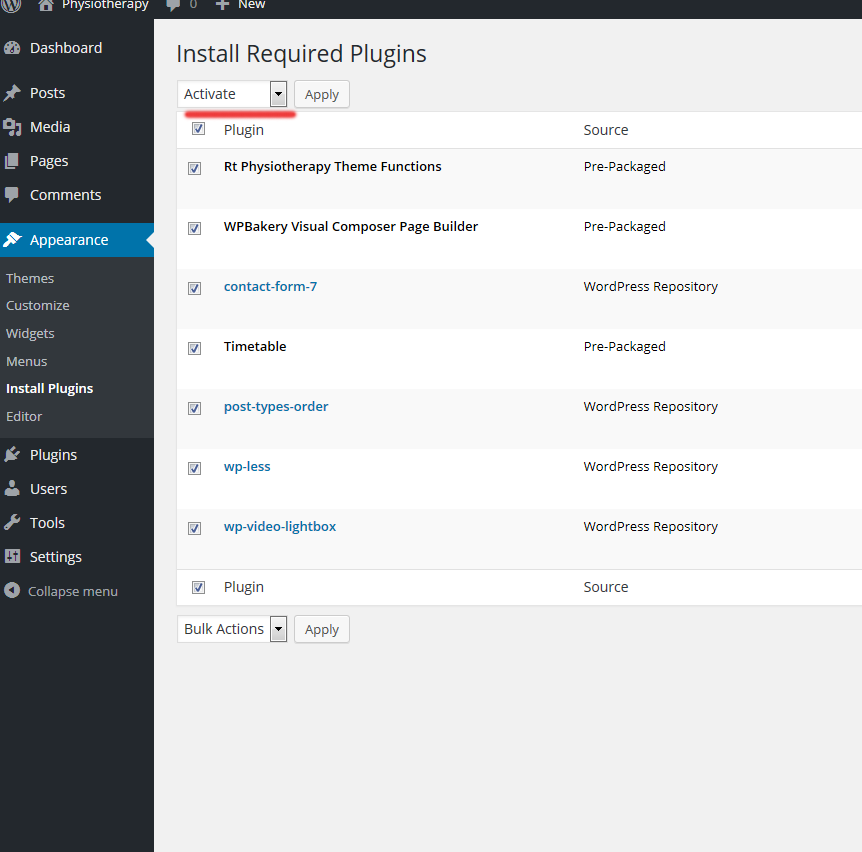
When finish plugin's instalation and activation you should see new post types links (left Dashboard side) for team, slider, carousel etc.:
In Dashboard:
-
4. It is recommended to deactivate comments for all future posts (you can activate it later on every individual post) turn it off in settings/discussion, uncheck "Allow people to post comments on new articles"
-
5. Go to tools/import and import demo.xml file. (demo files are in "demos" folder)


 It is normal if some of image placeholders are not imported, you will continue adding your images.
When it is imported go to slider, carousel, gallery and other custom post types, and in blog posts to add your content and images in "featured image".
It is normal if some of image placeholders are not imported, you will continue adding your images.
When it is imported go to slider, carousel, gallery and other custom post types, and in blog posts to add your content and images in "featured image".
Import widgets.wie file (from Demos folder) if you need exact widgets as in Theme demo. For widgets import, use this plugin for widgets import/export: https://wordpress.org/plugins/widget-importer-exporter/
-
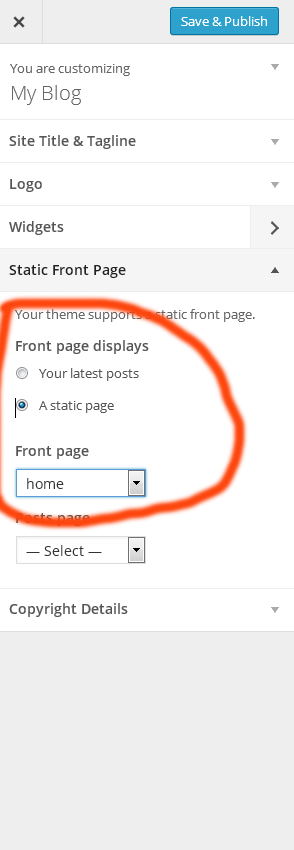
6. Go to appearance/customize and set static page (front page) for home page
-
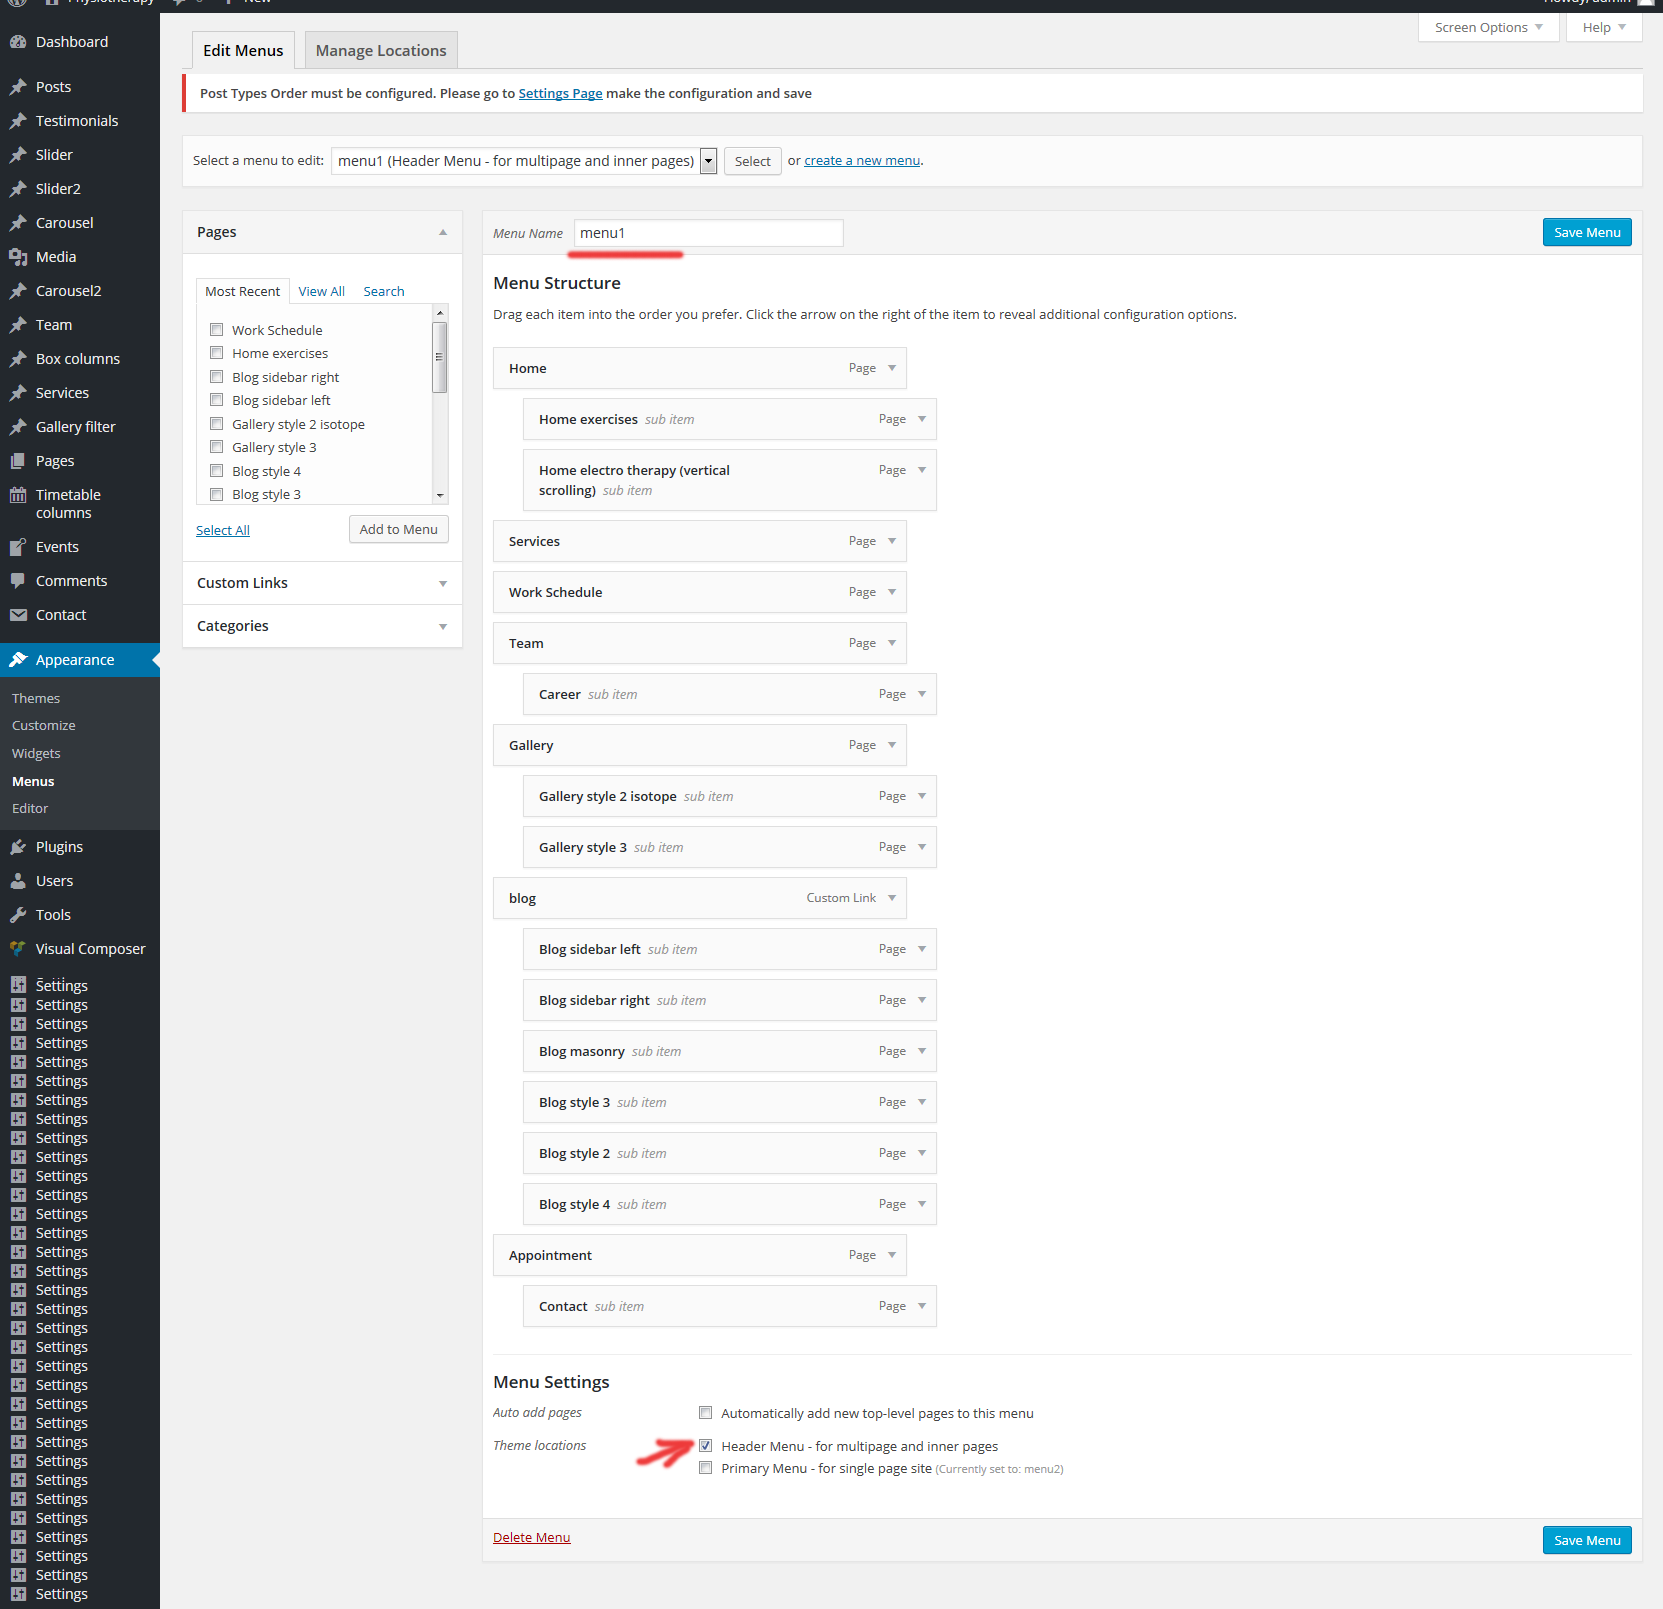
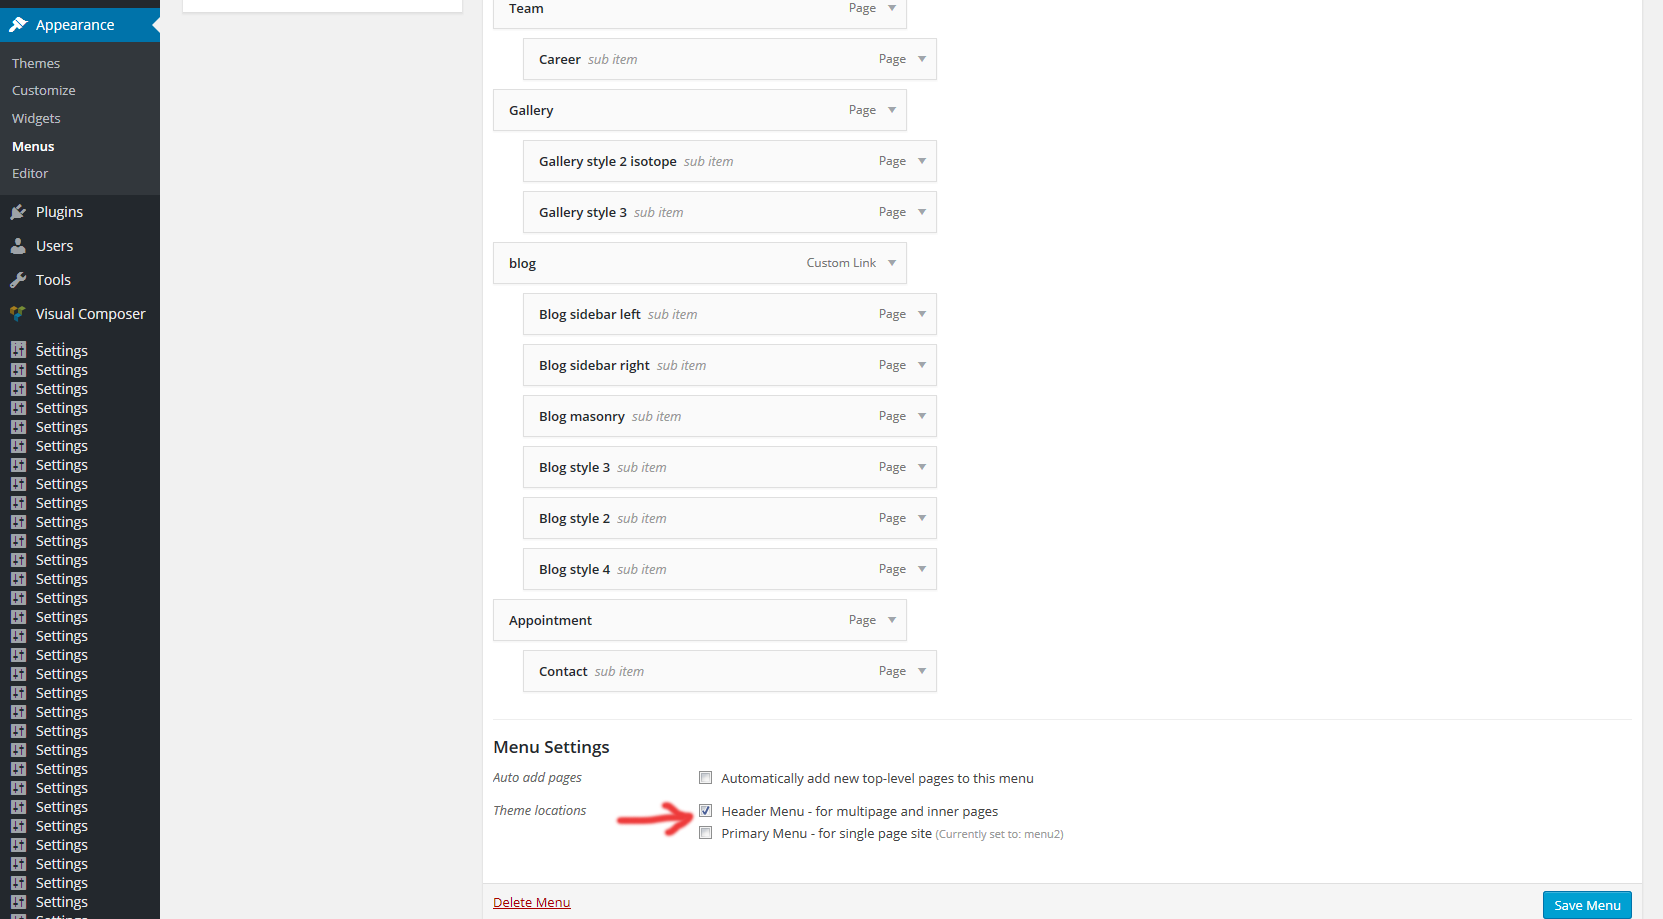
7. Go to appearance/menus and check if "menu1" and "menu2" appears. If you don't want to use one page homepage (vertical scroll) then you don't need menu2. In that case, you only need menu1 to be set for "Header menu". Menu2 is needed if you want to use vertical scroll and it needs to be set to "Primary menu"
-
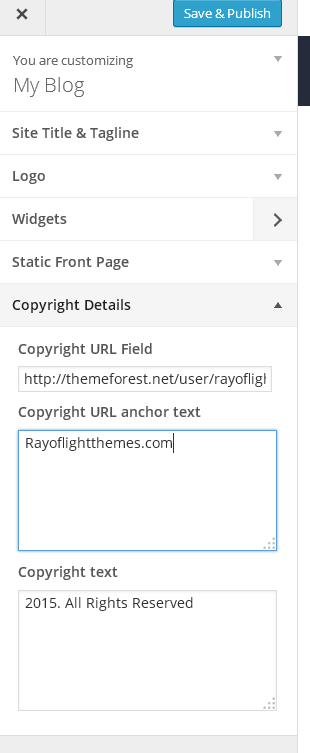
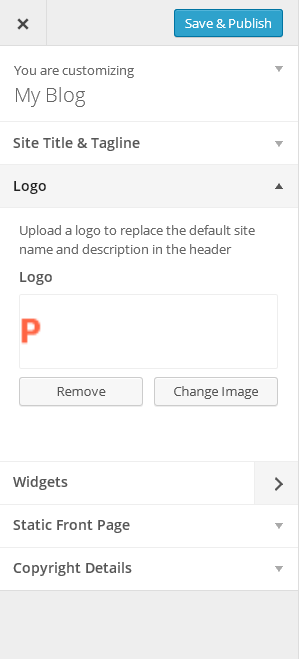
9. Go to appearance/customize add your copyright details, upload logo and add site title and tagline.
-
10. Upload demo content slider for Smart Slider 3. Demo slider is "Slider one.ss3" and is in Demos folder. .

-
11. If you want to make customization in code ( that suppose you know something about html/css and development in general ) it is recommended to use Child Theme.
-
12. Set contact forms to look like in Theme demo. See "contact form" section below.
-
13. If you use timetable, documentation for that plugin is in folder "documentation". Official page: http://codecanyon.net/item/timetable-responsive-schedule-for-wordpress/7010836
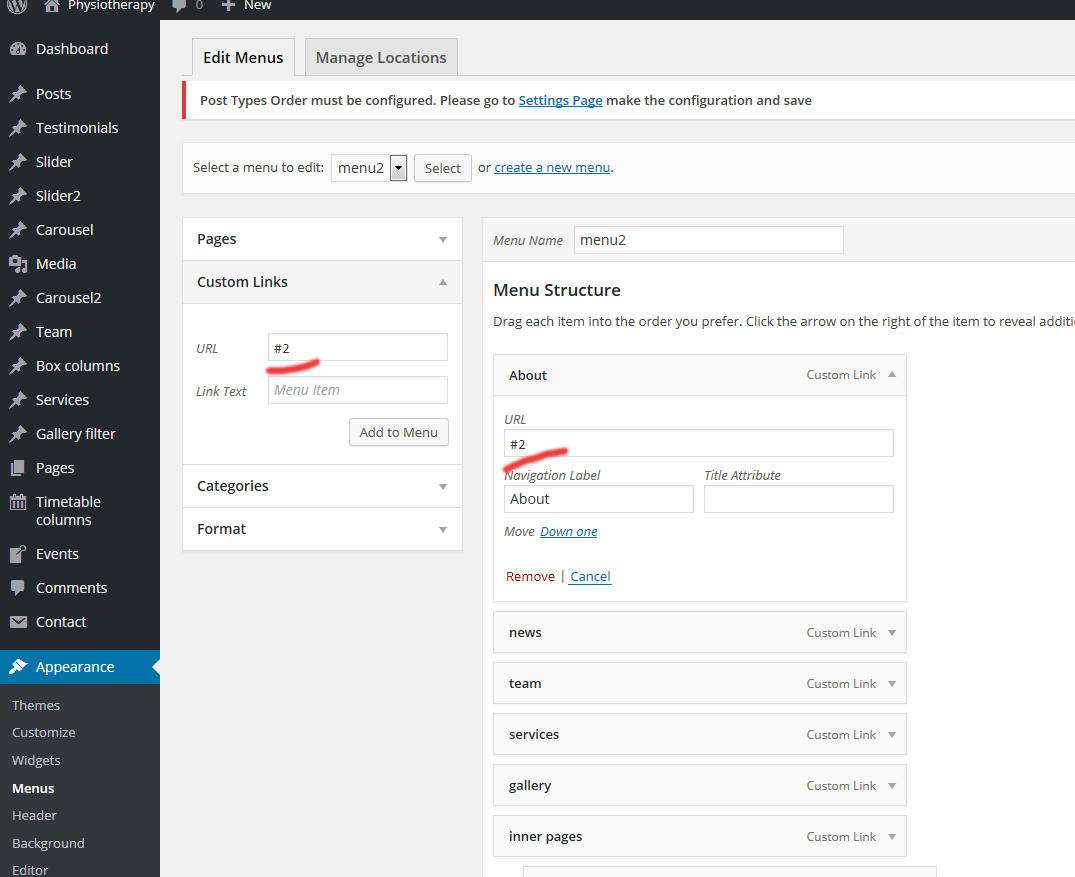
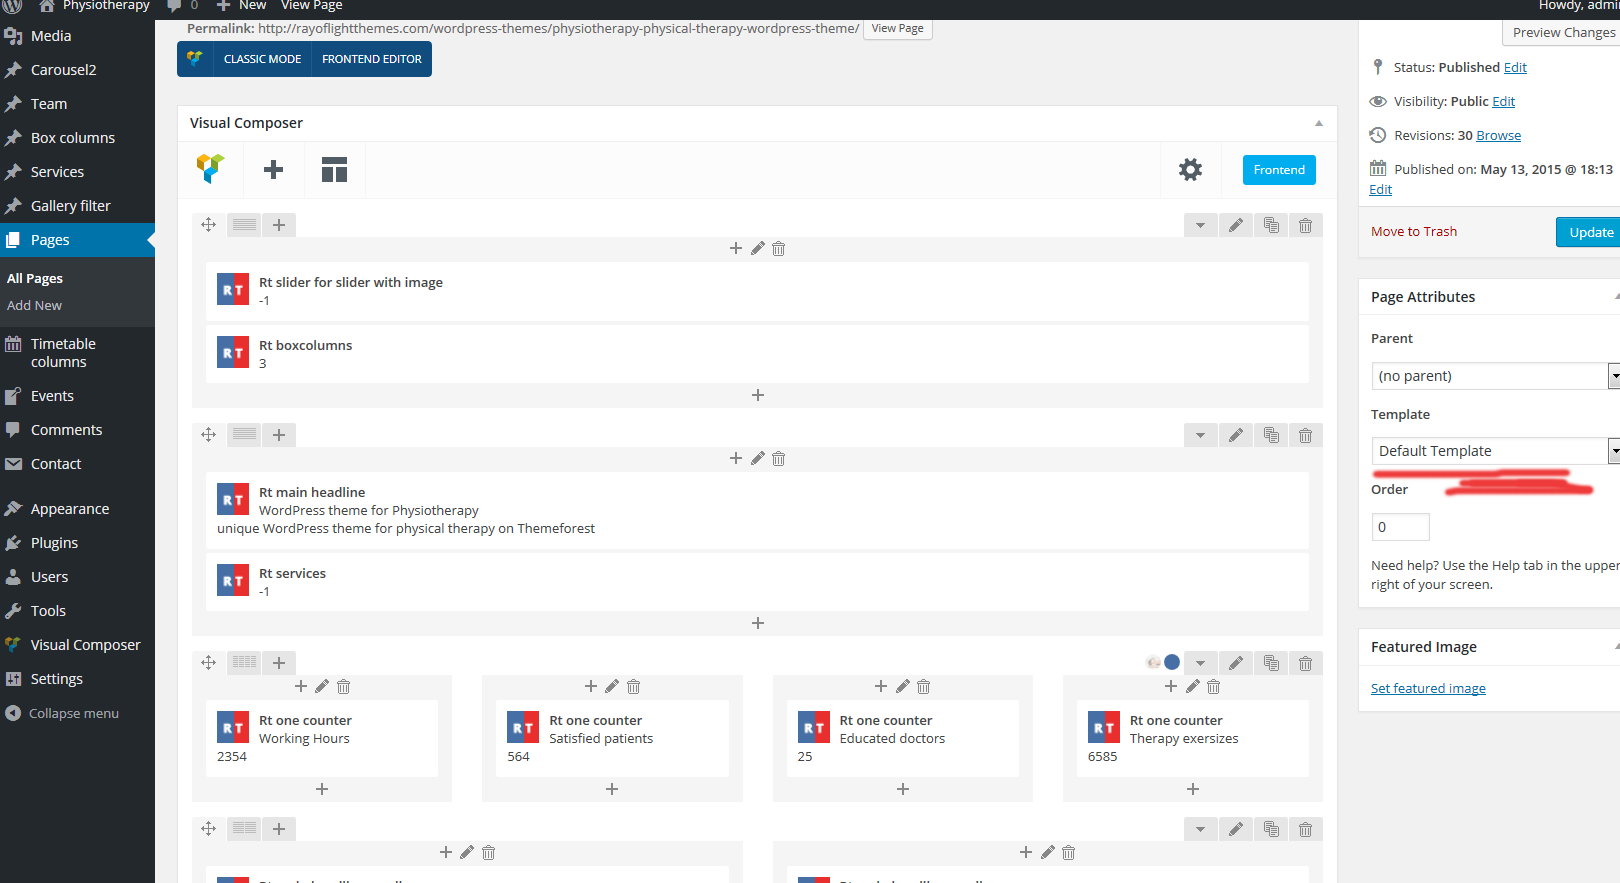
Very important detail about menu for one page homepage (vertical scroll) (menu2 in Theme demo, set to "primary menu") is that links in it need to be connected with page builder's row ID's where menu link will scroll to. Page builder's ID's and menu link should have the same name.
See screenshot to find where page builder row ID is:
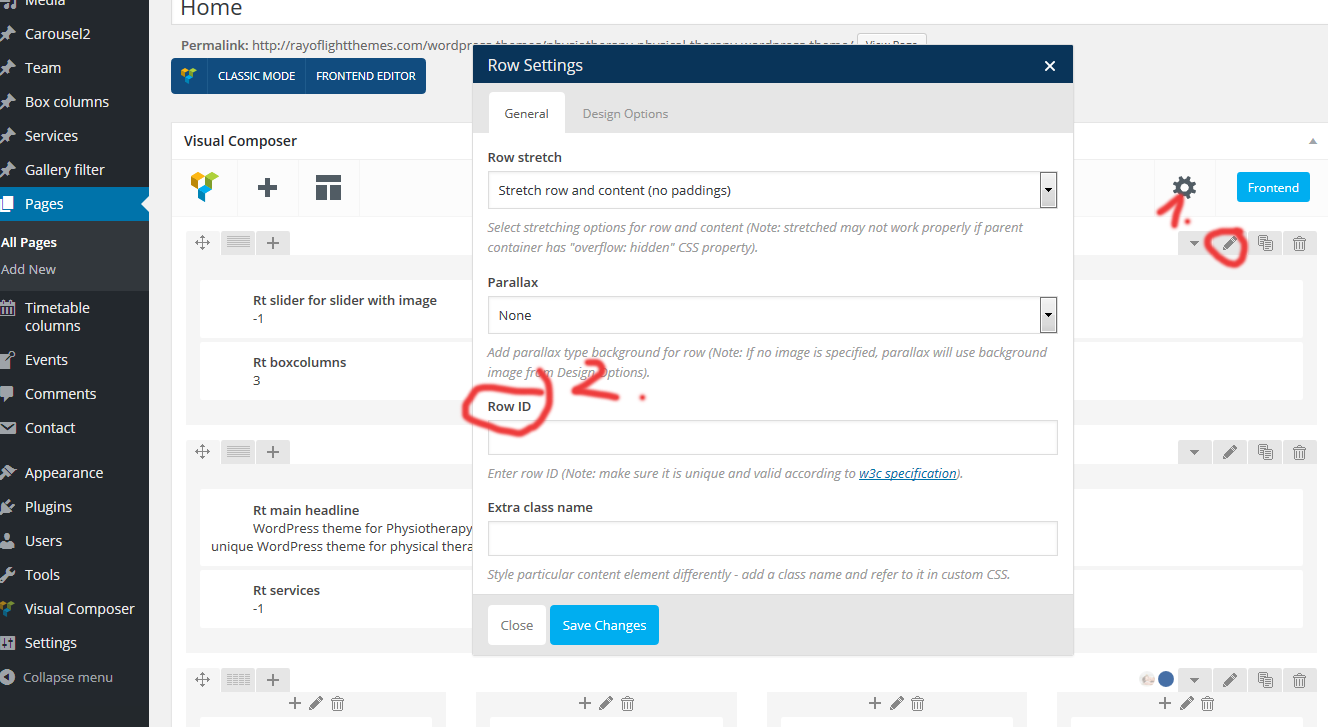
and where ID's name should be added in menu (with # before it): Be sure to always use "Links" from left side when adding links for vertical scrolling menu (menu2):
How to set (and reset) permalinks if there is 404 no found page for posts. - top
If you want to use permalinks it is very important to follow next procedure to get it work on all posts, pages and custom post types
1. Deactivate "Physiotherapy" theme and all plugins
2. Go to settings/permalinks, set permalinks to default and save
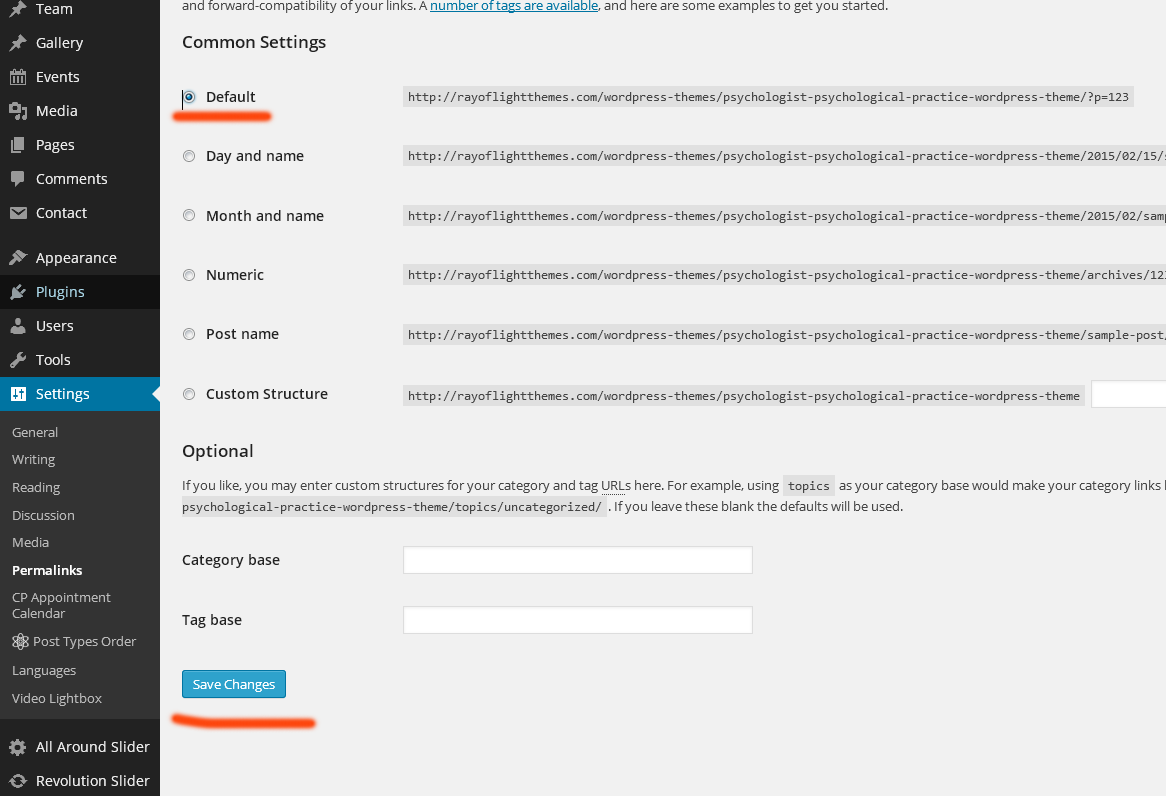
3. Set permalinks to "post name" and save again
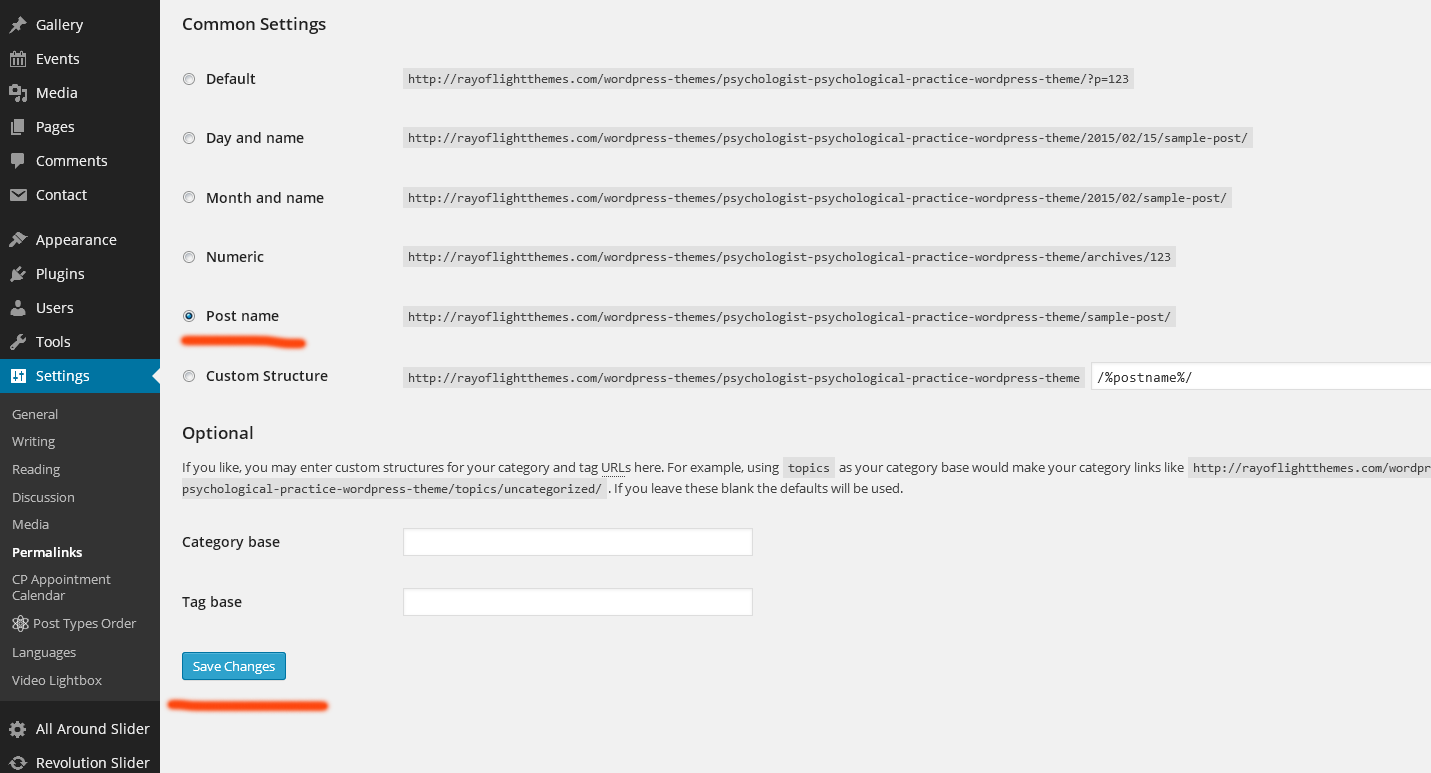
4. Activate "Physiotherapy" or "Physiotherapy child theme"
6. Activate all plugins recommended and required by theme (avoid other third party plugins, if you use them, be aware they can cause problem with Theme in some cases)
7. Permalinks should work now
8. If you ever deactivate rt-physiotherapytheme-functions plugin or Theme it may be needed to repeat these steps again to make permalinks work again
How to change color - top
NEW! Main colors can be changed without coding in Customizer/Global colors. Colors are unlimited and can be changed with color picker. It is important to check mark "choose this to activate this function". If there are elements that did not change the color after activating this function, that are usually icons (images, so they need to be uploaded as images) or page builder element color so it needs to be changed in that page builder element.
All explanation below for changing colors is depreciated, it is recommended to use only Global colors in customizer for color change.
If you want to change color or make any other change in theme's code it is recommended to use child theme. You can find child theme in main_file.zip packet you downloaded. (unzip it)
Before making changes in style.less code, be sure that wp-less plugin is instaled and activated if you want to see those changes on site. https://wordpress.org/plugins/wp-less/
Theme’s color should be changed in CHILD theme's style.less file.
To edit style.less file in child theme, open it inside C-panel or via FTP
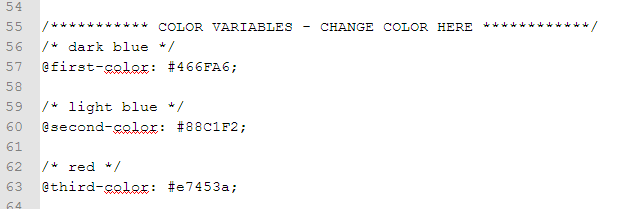
Find this code:
/*********** COLOR VARIABLES - CHANGE COLOR HERE ************/
/* dark blue */
@first-color: #466FA6;

/* light blue */
@second-color: #88C1F2;

/* red */
@third-color: #e7453a;
#466FA6,#e7453a,#e7453a - are color's HEX values.
@first-color,@second-color,@third-color - are color's variables
In Theme demo colors assigned to these color variables are: @first-color = dark blue color, @second-color = light blue color, @third-color = red color,
Now when you know which colors in Theme demo are assigned to color variables you can change colors. Basicaly you need to replace color HEX value for every variable with color HEX value for color you want. Or you can try to just add color name (e.g. red) instead of HEX values but it is more for testing purpose. To find HEX value for color you can use Photoshop or other software for graphic or take a look at this online color picker: http://www.w3schools.com/tags/ref_colorpicker.asp
After you changed hex codes for color and saved style.less file, new color should appear when you refresh page. (wp-less plugin is still activated). Now, you can leave it that way and continue use Theme if you're more comfortable that way (you don't like to work with code) or (that is recommended) go to one of less-to-css online compilers like: http://less2css.org/ and copy all code from child theme's style.less file, paste into editor and convert into css code. Then, open child theme's style.css file and copy/paste converted css code from compiler into it. (below first comment in style.css, without it child theme won't work). After this, wp-less plugin can be (and should be) deactivated.
Basic theme structure (how Theme works) - top
Theme has custom post types: slider, slider2, carousel, carousel2, team, box columns, services, gallery filter. Those post types (and custom shortcodes) are added via rt-phyisotherapy-theme-functions plugin file. They (and custom shortcodes) are added in Visual Composer page builder and when you open page builder you will see them as custom page builder elements with name starts with RT (and blue-red icon). They are added by Theme's custom plugin (rt-physiotherapy-theme functions plugin).Everything about parameters (options) for these custom shortcodes are explained in comments in every custom element in page builder.
Basically it is also possible to use shortcodes without page builder to create page elements (shortcode list is added below).
How to use page builder - top
If you didn't it is recommended to read previous section about Theme's structure to better understand this section about page builder.
Visual Composer page builder documentation is in Theme's folder "documentation". Official plugin link: http://codecanyon.net/item/visual-composer-page-builder-for-wordpress/242431
Activate Visual composer for slider custom post types or for any other page/post you want.
Visual Composer has built in elements and custom elements added by Theme's custom plugin rt-phyisotherapy-theme-functions (name starts with rt and blue red icon).
For all details about plugin please read official documentation and visit official plugin page.
Shortcodes - top
[rt_testimonials limit="-1" order="DESC"] [rt_slider limit="-1" order="ASC"] [rt_slider2 limit="-1" order="ASC"] [rt_working_time textleft="Monday - Friday" textright="08 am - 17 pm"] [rt_carousel limit="-1" order="ASC" columns="4"] columns: 1, 2, 3, 4, 5, 6 [rt_carousel2 limit="-1" order="ASC" columns="4"] columns: 1, 2, 3, 4, 5, 6 [rt_team limit="4" order="ASC" columns="4"] columns: 1, 2, 3, 4, 5, 6 [rt_homeblog limit="-1" order="DESC" columns="4"] columns: 1, 2, 3, 4, 5, 6 [rt_homeblog_list limit="2" order="DESC"] [rt_boxcolumns limit="3" order="ASC" columns="3"] columns: 1, 2, 3, 4, 5 [rt_services limit="-1" order="ASC" columns="3"] columns: 1, 2, 3, 4, 5, 6 [rt_gallery_filter limit="-1" order="ASC" columns="3"] columns: 2, 3, 4 [rt_one_counter headline="one counter" number="50"] [rt_banner text="call to action text" buttontext="see more" buttonurl="http://..." target="_blank"] target: _blank, _self [rt_slider_caption_text align="text-left" headlinesmall="small headline" headline="headline" subheadline="this is subheadline"] align: text-left, text-center, text-right [rt_slider_caption_button align="text-left" headlinesmall="small headline" headline="headline" subheadline="this is subheadline" size="button-large" buttonurl="http://..." buttontext="see more"] align: text-left, text-center, text-right size: button-large, button-medium, button-small [rt_main_headline headline="headline" subheadline="subheadline" align="text-center"] align: text-center, text-left, text-right [rt_main_headline_small headline="headline" align="text-center"] align: text-center, text-left, text-right [rt_button1 url="http://..." text="text" align="text-left" target="_blank" size="button-medium"] align: text-left, text-center, text-right target: _blank, _self size: button-medium, button-small, button-large [rt_button2 url="http://..." text="text" align="text-left" target="_blank" size="button-medium"] align: text-left, text-center, text-right target: _blank, _self size: button-medium, button-small, button-large
Bootstrap columns shortcodes -depreciated
[container]content[/container] [container][one]content[/one][/container] [container][one_third]content[/one_third][one_third]content[/one_third][one_third]content[/one_third][/container] [container][one_forth]content[/one_forth][one_forth]content[/one_forth][one_forth]content[/one_forth][/container] [container][one_half]content[/one_half][one_half]content[/one_half][one_half]content[/one_half][/container]
Page templates - top
In „page templates“ folder there are 8 page templates.
Template "Front Page (for one page website)" should be used for pages with vertical scroll (one page)
Other templates can be used for inner pages (multipage website). You can change them to see which one fits your website page the best.
Example of page template activation (right side of page, in exaple, template is set to default template):
Theme translation - top
Make sure translation plugin is activated. Check if settings/languages tab in Dashboard appears. In Theme's folder "languages" default po and mo files are included. To translate text strings in theme, please rename default.po and default.mo files to "language code" for language you want to translate in, for example if you translate to Portugales language code is "pt_BR" so default.po and default.mo should be renamed to "pt_BR.po" and "pt_BR.mo" Then open po file with Poedit and translate text strings that will appear .http://poedit.net/ More details about WordPress translation here:http://codex.wordpress.org/WordPress_in_Your_Language http://codex.wordpress.org/Installing_WordPress_in_Your_Language
You can use this plugin for translation. https://wordpress.org/plugins/polylang/
Contact form - top
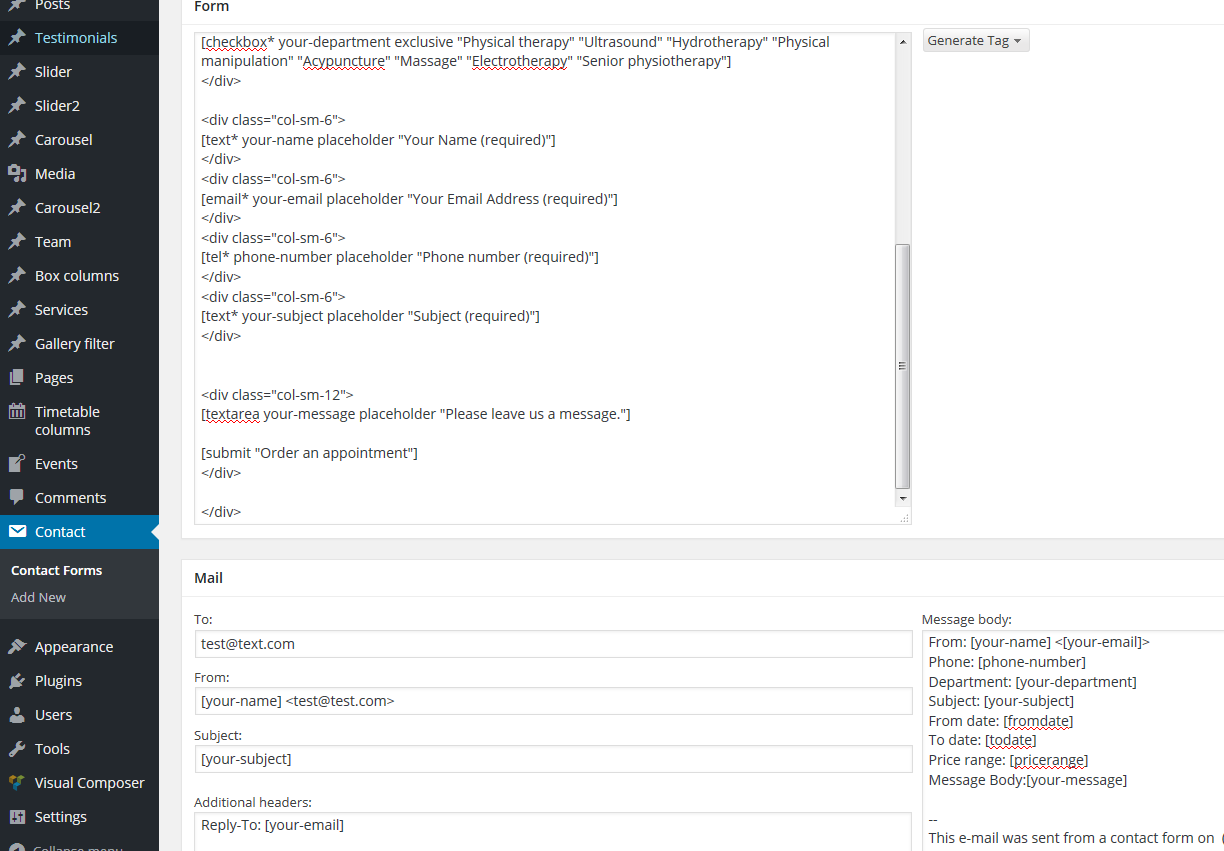
Make sure contact form plugin is activated and add this code snippets in contact forms:For appointment contact form:
add this in form field:
<div class="row">

<div class="col-sm-6">
<h5>1. Select Dates you're interested for appointment</h5>
[date fromdate placeholder "From date"]
[date todate placeholder "To date"]
</div>


<div class="col-sm-6">
<h5>2. Price range</h5>
[select pricerange include_blank "Basic plan" "Standard plan" "Advanced plan"]
</div>


<div class="col-sm-12">
<h5>3. Select department/service (required)</h5>
[checkbox* your-department exclusive "Physical therapy" "Ultrasound" "Hydrotherapy" "Physical manipulation"
"Acypuncture" "Massage" "Electrotherapy" "Senior physiotherapy"]
</div>

<div class="col-sm-6">
[text* your-name placeholder "Your Name (required)"]
</div>
<div class="col-sm-6">
[email* your-email placeholder "Your Email Address (required)"]
</div>
<div class="col-sm-6">
[tel* phone-number placeholder "Phone number (required)"]
</div>
<div class="col-sm-6">
[text* your-subject placeholder "Subject (required)"]
</div>


<div class="col-sm-12">
[textarea your-message placeholder "Please leave us a message."]

[submit "Order an appointment"]
</div>
add this in message body field:
From: [your-name] <[your-email]>
Phone: [phone-number]
Department: [your-department]
Subject: [your-subject]
From date: [fromdate]
To date: [todate]
Price range: [pricerange]
Message Body:[your-message]
For file upload contact form
add this in form field:
      <div class="col-sm-12">
<h4>Choose which position you're interested in to apply</h4>
[select job "doctor" "nurse" "therapist"]
</div>

<div class="col-sm-12">
<h4>Send your information and CV</h4>
</div>

<div class="col-sm-6">
[text* your-name placeholder "Your Name (required)"]
</div>
<div class="col-sm-6">
[email* your-email placeholder "Your Email Address (required)"]
</div>
<div class="col-sm-6">
[text* your-subject placeholder "Subject (required)"]
</div>
<div class="col-sm-6">
[file cv]
</div>


<div class="col-sm-12">
[textarea your-message placeholder "Please leave us a message."]

[submit "Send"]
</div>
add this in message body field:
From: [your-name] <[your-email]>
Subject: [your-subject]

Message Body:
[your-message]
[job]
[cv]
For simple contact form
add this in form field:
<div class="col-sm-12">
[text* your-name placeholder "Your Name"]
[email* your-email placeholder "Your Email Address"]
[text* your-subject placeholder "Subject"]
</div>
<div class="col-sm-12">
[textarea your-message placeholder "Please leave us a message."]
[submit "Send"]
</div>
For sign up
add this in form field:
      [email* your-email placeholder "Your Email Address (required)"]
[submit "Send"]
How to reorder posts - top
Use this plugin for reordering posts. Instal and activate. It will add re-order link next to every post type for manual post reorder. https://wordpress.org/plugins/post-types-order/
Plugins - top
More about plugins you can find in plugin's header informations.3 plugins are bundled with theme: 1. Rt physiotherapy-theme functions, 2. Visual Composer 3. Timetable Schedule
Rt Physiotherapy-theme functions Theme's plugin that contains custom post types and shortcodes for theme. Should always be activated with theme.
Visual Composer page builder plugin Should always be activated with theme. Official page: http://codecanyon.net/item/visual-composer-page-builder-for-wordpress/242431
Timetable Schedule plugin Official page: http://codecanyon.net/item/timetable-responsive-schedule-for-wordpress/7010836
Contact form 7 plugin For contact form, see information about contact form above. Official page: https://wordpress.org/plugins/contact-form-7/
Video lightbox plugin For popup image, see more information in "Custom post types - gallery" section. Official page: https://wordpress.org/plugins/wp-video-lightbox/
Widgets - top
Widgets are default WordPress functionality, find them in appearance/widgets in Dashboard. Official documentation: http://codex.wordpress.org/WordPress_Widgets
If you already imported widgets.wie file then you already have widgets as in Theme demo, if you didn't then there are code snippets for them:
Theme has 9 widgetized areas.
For "footer 1" and "header 1" widget areas there are code snippets that are used for icons.
In "footer first" and "header second" widget areas add "text widget" and add this code snippet (below) for icons in it and edit it with your links and text. (this is icon list, find if icon you want to add exist on list: http://fontawesome.io/cheatsheet/ )
Every [rt_social_icon url="https://twitter.com" icon="fa fa-twitter"] is one shortcode for one icon, just add your link and icon name. Delete or add as much as you need these icon shortcodes.
Icon's code snippet:
<ul class="socialicons">

[rt_social_icon url="https://facebook.com" icon="fa fa-facebook"]
[rt_social_icon url="https://twitter.com" icon="fa fa-twitter"]
[rt_social_icon url="https://youtube.com" icon="fa fa-youtube"]
[rt_social_icon url="https://instagram.com" icon="fa fa-instagram"]
[rt_social_icon url="https://linkedin.com" icon="fa fa-linkedin"]
[rt_social_icon url="https://tumblr.com" icon="fa fa-tumblr"]
[rt_social_icon url="https://digg.com" icon="fa fa-digg"]
[rt_social_icon url="https://lastfm.com" icon="fa fa-lastfm"]

</ul>
Header2 widget area, for links list (ul li list) add this code snippet bellow (in text widget):
<ul class="headerul" style="float: right;">
<li>
<a href="">Doctors Timeline </a>
</li>
<li>
<a href="">Contact </a>
</li>
<li>
<a href="">Appointment</a>
</li>
</ul>
Header3 widget area for address and phone add "text widget" and add this code snippet (below):
<ul class="address-shortcode">
[rt_address_phone2 text="Call Us +548 9587 548" icon="phone" url="tel:1234"]
[rt_address_phone text="Address Street 123, City" icon="map-marker"]
</ul>
Custom post types - top
Custom post types and shortcodes are added via custom Theme's plugin rt-phyisotherapy-theme-functions. Custom post types are: slider, slider2, carousel, carousel2, team, box columns, services, gallery filter.
Some of custom post types should not have individual posts visible because of duplicate content and SEO issues that can make. Those custom post types have hidden individual pages. Those are: sliders, box columns, testimonials. Other custom post types (carousel, team, services, gallery filter) should have visible individual posts because it's content is separated to one part visible in place on page where you add them via page builder elements, and another part that is visibla only in individual posts.
Example of custom post type structure: Team custom post type
In every "Team" individual post following information can be added: Headline - for team member name, text editor - for text about team member, checkbox - for removing sidebar in post, team member job/position - for team member job, feature image - for image, excerpt - for info like social media that appear on roll over team member image (see Theme demo)
In individual team posts everything from fields listed above will appear except the excerpt. In Team query that is added in front page via page builder element, appears everything except text from text editor.
This is code snippet for adding in excerpt that will appear on roll over team member image. (icon list, find if icon you want to add exist on list: http://fontawesome.io/cheatsheet/ )
Every
<li>
<a href="#" class="hvr-shutter-out-horizontal"><i class="fa fa-facebook"></i></a>
</li>
is one icon, just add your link and icon name. Delete or add as much as you need icons.
<ul>
<li>
<a href="ADD YOUR FACEBOOK LINK HERE" class="hvr-shutter-out-horizontal"><i class="fa fa-facebook"></i></a>
</li>
<li>
<a href="#" class="delay hvr-shutter-out-horizontal"><i class="fa fa-twitter"></i></a>
</li>

<li>
<a href="#" class="hvr-shutter-out-horizontal"><i class="fa fa-linkedin"></i></a>
</li>

</ul>
Example of custom post type structure: Gallery filter custom post type
In every "Gallery" individual post following information can be added: Headline - for image name, text editor - for text about image, checkbox - for removing sidebar in post, feature image - for image, excerpt - for info like link to individual gallery post or/and popup image that appears on roll over gallery image (see Theme demo)
In individual gallery posts everything from fields listed above will appear except the excerpt. In Gallery query that is added in front page via shortcode appears everything except text from text editor.
This is code snippet for adding in excerpt that will appear on roll over gallery member image. (activate wp video lightbox plugin to achieve popup image effect)
		  <a href="ADD IMAGE FOR POPUP LINK HERE"
		  rel="wp-video-lightbox" >
		  <i class="fa fa-search"></i></a>
(If you know nothing about HTML and really really don't know where to add links or change icons, please send support message for help.)
How to change favicon - top
https://codex.wordpress.org/Creating_a_Favicon
CSS files - top
style.css file as main styling file (and style.less file with the same content, see more about less files above in "how to change color". In assets/css there are: bootstrap.css, font-awesome.css (with fonts folder) and animate.css that are connected via links in top of style.css
JS files - top
In assets/js there are all JS files needed, connected via functions.php and scripts.js for preload scripts.
PHP files - top
Bundled plugins in plugins folder. Other php files are standard WP files.
Sources and Credits - top
More about js and css files credit you can find in js and css file’s headers
- TGM plugin activation https://github.com/thomasgriffin/TGM-Plugin-Activation
- Meta boxes https://wordpress.org/plugins/meta-box/
- jQuery Scripts and css files: bootstrap,css, animate.css, fontawesome.css bootstrap.js, sticky.js, retina.js, colorbox.js waypoints.js, countto.js, flickity.js, isotope.js
- iconfinder.com, http://flaticon.com/
- Font Awesome font icons
- Google font: Roboto, Open sans
- Premium plugins: Visual Composer and Timetable Schedule
- Free plugins customized for Theme and listed above
- Blueprind framework for documentation
- Images for Theme demo: Photodune, Dreamstime
Once again, thank you so much for purchasing this theme. If you have more general question relating to themes on ThemeForest, you might consider visiting the forums and asking your question in the "Item Discussion" section.
Rayoflightthemes